
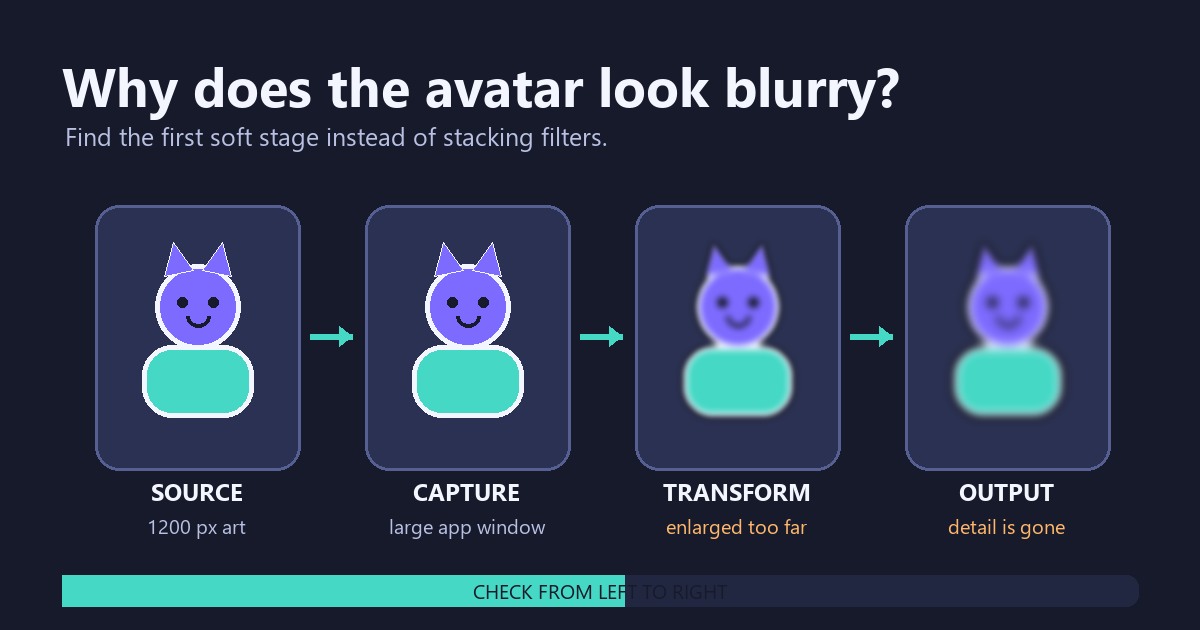
A PNGTuber can look crisp in its original file and soft once it reaches OBS. The blur usually enters somewhere between the source image, the captured app window, the OBS transform, and the final output. Changing random filters makes that chain harder to diagnose. Check one stage at a time instead.
This guide deals with overall softness, stretched proportions, and detail lost through scaling. If the avatar is sharp but has a pale or dark fringe, use the separate guide to fix transparent PNG edge halos. A halo and a blurry source can appear together, but they are different faults.
Start with the source image outside OBS
Open one avatar state in an image viewer and inspect it at 100% zoom. Look at the eyes, mouth, hair tips, and outline. If those features are already soft or blocky, OBS cannot restore the missing detail. Sharpening may make an edge more obvious, but it cannot reconstruct eyelashes or linework that never reached the file.
Check the pixel dimensions as well. The important comparison is between the source and the size it occupies in the stream. A 300-pixel-tall character enlarged to 900 pixels has to invent two thirds of the displayed pixels. A large source reduced for a corner layout normally has more information to work with, though extreme reduction can still swallow very fine details.
If you use a captured Veadotube Mini window rather than a direct Image source, the capture starts with the app’s rendered window. Make that window large enough to give OBS a useful input. The full PNGTuber and OBS setup guide covers the available capture routes. Fix capture quality before tuning the scene transform.
Reset the OBS transform before guessing
Select the avatar source, open its transform controls, and note its current size and crop. If the source has been dragged, cropped, stretched, and resized several times, reset the transform and place it again. Work from a corner handle so the original proportions stay intact.
OBS explains that ordinary scaling changes a source’s size, while cropping removes part of it. Holding Shift while resizing can stretch a source and change its aspect ratio. The official OBS aspect ratio guide warns that stretching is likely to produce a blurry, malformed result. If a circular eye has become oval or the head looks wider than the original, suspect stretching before compression.
Cropping does not inherently blur an image, but it can lead to a second mistake: cropping tightly, then enlarging the small remainder until it fills the intended space. Compare the source’s bounding box before and after the crop. You may be magnifying a much smaller region than expected.
Compare the source size with its displayed size
Use OBS’s Edit Transform panel for a concrete comparison. Record the source dimensions and the transformed dimensions instead of judging only by the large preview. If the scale is far above 100%, enlarge the source at the capture stage or export a larger image. If it is far below 100%, test a less detailed version of the art; tiny highlights and one-pixel lines often merge during reduction.
Do not keep resizing the same source during the test. Duplicate the scene or source, then create three versions:
- the source at its intended size;
- a deliberately enlarged version;
- a smaller version that leaves more room around gameplay.
Record ten seconds and compare the file at normal playback size. The OBS editor preview can itself be scaled to fit its panel, so it is useful for composition but not always a faithful pixel-level check.
Try scale filtering after the geometry is correct
Right-click the source and inspect Scale Filtering. OBS says different options suit different source types and suggests trying Bicubic when a source looks soft. Point or Area can make sense for deliberate pixel art. For smooth illustrated PNGTuber art, compare the available filters in a short recording rather than assuming that the sharpest-looking preview is automatically best.
OBS also provides a Scaling/Aspect Ratio effect filter. Its official filter reference says the filter changes the source’s scale filtering type and aspect ratio. That can make a deliberate resize repeatable, but it does not add source detail. Avoid stacking transform scaling, a scaling filter, and another resize in a nested scene unless each step has a clear reason.
A sharpen filter is not the first fix. Strong sharpening can draw bright rims around hair and make compression noise more visible. Return to the clean source, correct its size and proportions, choose one scaling method, and only then decide whether a restrained adjustment helps.
Check the canvas and output as separate stages
OBS can render a scene on one base canvas and scale it to another output resolution. That is another resize after the avatar source has already been transformed in the scene. Open Settings, then Video, and write down both values. A 1920×1080 canvas sent at 1280×720 is a normal workflow, but small facial details will be reduced with the rest of the scene.
Judge the exported recording at the final resolution. Pause on an open-mouth frame and a closed-mouth frame. If the canvas preview is crisp but the recording is soft, inspect output scaling and recording settings. If both are soft, move backward to the source transform or capture window.
Compression can add smearing, especially around moving mouths, blinking eyes, and fine transparent hair. Do not diagnose that from a still PNG. Make a local recording with several state changes. If still frames are clean before movement but break up during transitions, the problem is later in the video path rather than in the avatar artwork.
Keep blur separate from a transparency halo
Blur spreads or softens real details. A transparency halo adds an unwanted light, dark, or colored rim around otherwise recognizable art. Put the avatar over both a pale background and a near-black background. If the face remains sharp while the outer edge changes color, inspect the alpha edge. If the eyes, mouth, and linework are soft on both backgrounds, follow the scaling chain.
One filter change may affect both symptoms, which is why the distinction matters. A harsher filter can make a soft image look more defined while exaggerating a contaminated transparent edge. Solve the source problem you can actually see instead of chasing a single setting for every case.
A short diagnostic order
- Open the original avatar image at 100% and confirm that its details are sharp.
- Compare its pixel size with the size used in the scene.
- Make the captured avatar window larger if OBS receives a small rendered source.
- Reset the transform, preserve the aspect ratio, and check for an aggressive crop.
- Compare scale filters in a local recording.
- Check the base canvas and output resolution separately.
- Review speaking and blinking motion, not only a still preview.
Stop when you find the first stage where the image becomes soft. Changes made after that stage may disguise the problem, but they will not repair the lost information. Once the avatar survives a short local recording at normal playback size, save the scene and leave the working transform alone.