
A floating mug looks charming until it covers your PNGTuber’s mouth. Putting every prop into the avatar artwork makes that mistake harder to fix: you would need to edit each reactive state. In OBS, give a transparent prop its own Image source. You can move it, resize it, or hide it without rebuilding the character.
This guide starts after you have a finished avatar image set or a working avatar-app capture. It covers static props in an OBS scene, not animated alerts or face tracking. If you need new props, the FreePNGTuber asset maker creates a downloadable set of four transparent PNG props; it does not place them in OBS for you.
Check the PNG before adding it
Open the prop file over a dark background and a light background in an image editor. A checkerboard alone can hide pale edge debris. Check that the actual file has transparency, rather than a checkerboard painted into the picture. Look at the handle or string on a mug or accessory too: thin details that look fine enlarged can vanish at stream size.
Keep a copy of the original download and work from a named folder. If you move or delete an image later, a scene source that points to its old location can go missing. For a few frequently used props, names such as prop-mug-blue.png and prop-microphone-copper.png are easier to identify than a run of numbered exports. The prop’s transparent canvas may have empty padding; what OBS selects is the whole image rectangle, so expect to adjust the source after import.
Add one prop as an Image source
Open the scene where your avatar already appears. In the Sources dock, select the plus button, choose Image, and give the new source a name that describes the object. Point Image File at the transparent PNG. OBS’s Image Sources documentation lists PNG support and alpha-channel support. It also describes an optional setting to unload hidden images; leave that at its normal setting unless you have a reason to trade memory use for a possible brief reload when the source becomes visible again.
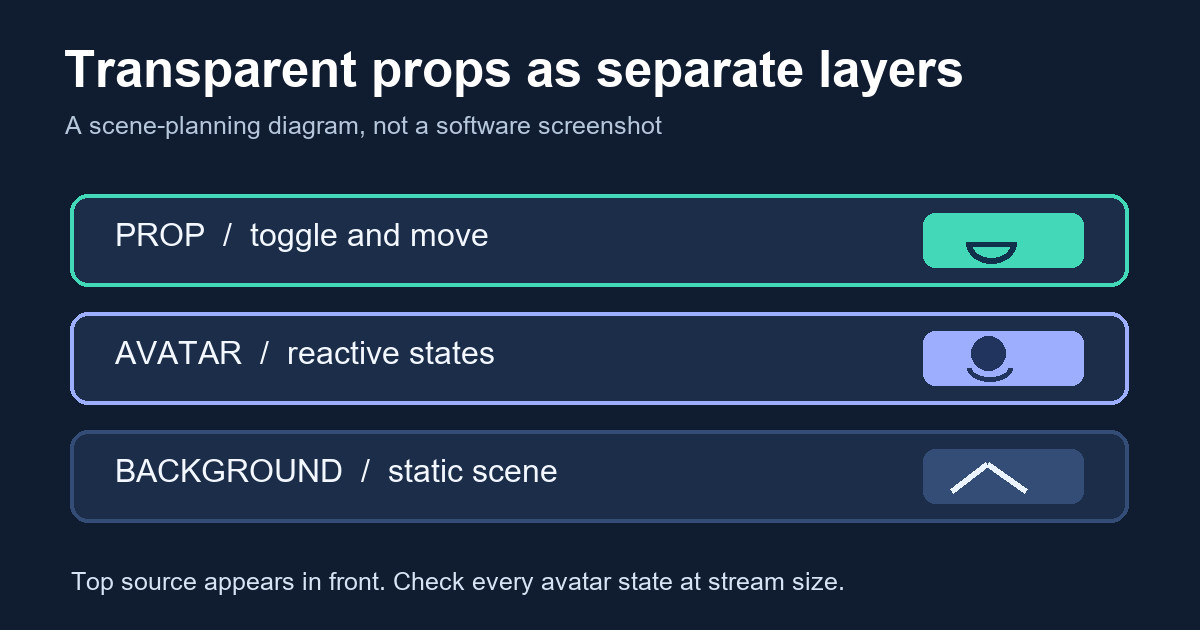
Place the source where it belongs in the list. Sources higher in the list appear above lower ones. For a mug held in front of the avatar, put the mug above the avatar capture. For a lamp that belongs behind the character, put it below the avatar but above the background. OBS’s source ordering guide explains this stack. Do not flatten the prop into the avatar’s idle state and forget the talking and blink states; it may jump or disappear the next time the avatar changes.
Position it at the size viewers will see
Drag the prop into place in the preview and resize it with the handles. Open Edit Transform if you need more precise positioning; the OBS positioning guide describes both methods. Keep enough distance from the face for the mouth and eyes to stay visible. A large microphone can look like it belongs in the scene while still swallowing the most important reactive movement.
Look at the whole composition, not just the object’s bounding box. A prop meant to sit beside an avatar should not cover the game’s HUD, a caption band, or an alert position. If you use a separate Just Chatting scene and gameplay scene, place and test the object in each scene where it appears. A prop that feels subtle on a full-screen talking layout can dominate a smaller corner avatar.
Change the avatar between quiet, talking, and blink states. If its pose shifts, a fixed mug might float away from the hand. Moving the OBS source will not make the prop follow every pose automatically. You may need a different placement, a simpler object that does not need to touch the hand, or revised source artwork with more consistent state alignment.
Make variants without making a mess
Use one Image source per prop you want to control independently. Put a cup, a small desk mascot, and a decorative spark in separate sources if you expect to toggle them independently. If two objects always belong together, you can keep them in one image instead; there is no prize for the longest Sources list.
Name sources by what a streamer would look for during setup: Prop / mug or Prop / small mascot. Use the eye icon in the Sources dock to hide a prop temporarily, then show it again when needed. OBS documents that visibility control in its Sources Guide. Hide any test object before recording the final scene if it should not appear live.
Resist adding every matching object to a single layout. A restrained mug next to a chat avatar may help establish the scene; an effect, headphones, mascot, badge, and glitter all fighting for the same corner can make the face harder to find. Keep at least one clean layout to compare against the decorated version.
Run a short scene check
- Preview the avatar over both a light and a dark section of your actual scene. Watch for a pale fringe around the prop and for parts of it disappearing.
- Cycle through the avatar states while watching any prop that seems attached to the body. Check its relative position each time.
- Toggle each prop’s eye icon. Confirm that hiding the mug does not hide your avatar or another object you meant to keep.
- Watch the scene at the size a viewer will see it, including a small player view. Make sure expressions still read and important scene content is uncovered.
- Make a short local recording, then play it back. The OBS preview is useful, but the recorded composition is the clearer check before a live session.
If the avatar capture itself is missing or sits behind the wrong layer, use the dedicated PNGTuber to OBS setup guide. Keep prop placement as a separate job: once the avatar is stable, you can add or remove objects without breaking its reactive image states.
Common problems
The prop has a solid rectangle behind it. Inspect the file outside OBS. Saving an image with a visible checkerboard background does not create transparency; export a real RGBA PNG and replace the Image File. If the edge looks dirty rather than solid, check the original artwork before trying scene filters.
The prop is behind the room. Move its source above the room in the Sources list. If it must sit partly behind the avatar, keep it below the avatar capture while leaving the background underneath both. The preview makes the intended overlap easier to judge than a filename does.
The prop looks blurry. Try it closer to its native size rather than enlarging a tiny export. Check the source file at the intended display size first. Resizing settings cannot add detail that the image never contained.
The prop covers the face only when talking. Switch through all states while adjusting the position. The mouth-open art may occupy more room than the idle art. Leave space for that change rather than tuning the mug against one still frame.
A separate source is most useful when it gives you a simple choice during a stream: show the prop, hide it, or move it out of the way. Keep the avatar readable first and let the objects support the scene.