
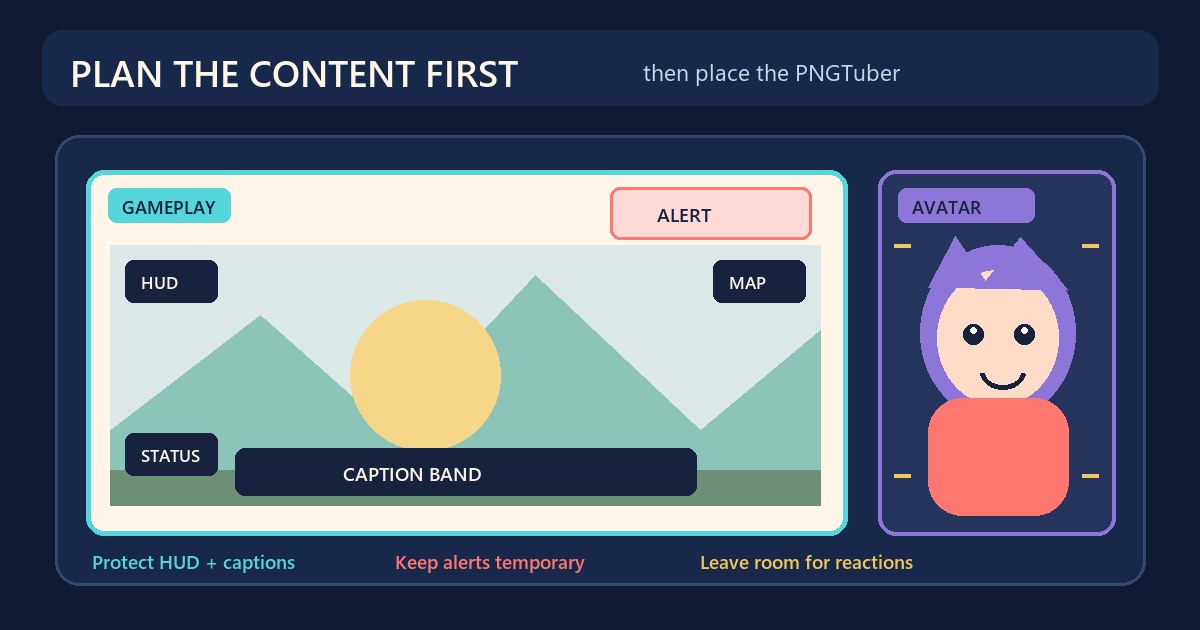
A stream overlay can look tidy in an empty design file and fail as soon as a game starts. A quest prompt appears under the avatar. Subtitles sit behind a decorative frame. An alert lands on top of both. The problem is usually not the art. It is that the layout was planned before anyone marked the content that must stay visible.
Start with the game, then place the PNGTuber around it. This keeps the overlay useful during play instead of turning the stream into a poster with a small game window.
Start with one real game frame
Take a still frame from the kind of game you expect to stream. Use a moment when the interface is busy: health bars, a minimap, dialogue, inventory prompts, or multiplayer status. A clean title screen tells you very little about the layout viewers will see most often.
Mark each interface element that carries information. Do not assume every game uses the same corners. A minimap may sit at the top right in one game and the bottom left in another. Dialogue can occupy the lower third, while accessibility captions may appear near the center. The safe area is specific to the game and scene, not a universal rectangle copied from a template.
The official OBS game screen tutorial makes the same practical point for webcam placement: resize it and put it near a corner or edge where it does not cover important information. A PNGTuber needs the same care, although its transparent silhouette may take up a different shape than a rectangular camera feed.
Give the avatar a home, not a random corner
Choose the avatar side after checking the game interface. A right-side PNGTuber works when the important HUD is concentrated on the left. Move the avatar left when menus, party information, or subtitles need the right side. If you regularly switch between games with different layouts, make a left version and a right version rather than dragging the source live and hoping it fits.
Leave a small margin around the hair, ears, hats, and props. The character should not look glued to the canvas edge. That margin also gives shaking or waving effects room to move without clipping.
Judge the size from the composed stream, not from the source image. The face and mouth need to remain readable, but the character should not hide the action. Switch through the idle, talking, and blinking states while the game frame is visible. A pose that fits perfectly may have a speaking state with wider hair, hands, or accessories.
Separate the layout into working zones
A useful overlay plan has several zones, but they do not all need boxes or borders:
- Gameplay: the largest uninterrupted area, including the HUD positions you marked.
- Avatar: enough room for the full reactive silhouette and its widest state.
- Captions: a readable band that does not sit behind the avatar or the game’s own subtitles.
- Alerts: a temporary area away from menus and other time-sensitive information.
These zones can overlap visually when the content does not compete. A transparent sleeve may extend over empty scenery, for example. What matters is whether the overlap hides information or makes the avatar hard to read.
Decorative art belongs around the remaining space. Keep strong lines, bright lights, and detailed ornaments away from the face and game interface. A restrained frame often works better than an elaborate one because it survives more games and scene changes.
Check the overlay at the final canvas ratio
Plan in the same aspect ratio as the OBS canvas. A frame built for one ratio can stretch, crop, or expose gaps when forced into another. If you need landscape and vertical layouts, treat them as separate compositions. The avatar and gameplay do not keep the same relationship when the canvas shape changes.
The Free VTuber Overlay Maker can create a text-free frame with a chosen avatar side and a clear gameplay area. It is useful after you know where the open areas belong. Add exact channel names, labels, and schedules later in OBS or a design editor so you can correct and update them without rebuilding the art.
Keep the game source at a useful size. Shrinking gameplay just to reveal more decoration usually makes menus and subtitles harder to read. If a decorative panel has no job, remove it and give those pixels back to the content.
Test three moments before you keep the layout
Run a short local recording with three representative moments:
- A busy gameplay scene with the normal HUD visible.
- A dialogue or menu screen with text near the edges.
- An avatar reaction while an alert appears.
Watch the recording at normal viewing size. Look for covered prompts, clipped character details, tiny text, and places where several bright elements fight for attention. Pause on the worst frame and move one element at a time. This is more reliable than judging the layout from an empty OBS preview.
Also check the mouth and eyes against the material directly behind them. If the face disappears into a bright or similarly colored area, move the avatar, calm that part of the overlay, or add restrained edge separation. Do not use a thick outline as the automatic fix for every scene.
Build two variants when one layout cannot fit every game
One overlay does not need to solve every possible stream. Keep a left-avatar scene and a right-avatar scene when your regular games place information on opposite sides. For games with dense interfaces, use a lighter scene with fewer decorative elements. A chatting scene can afford a larger character because there is no gameplay HUD to protect.
Name the OBS scenes by purpose, such as Game - Avatar Left and Game - Avatar Right. Lock the positioned sources after the test. The detailed capture, cropping, and output-size steps belong in the PNGTuber and OBS setup guide; the job here is to decide what each part of the canvas is allowed to cover.
A quick overlay review
- The game remains the largest useful area.
- The avatar does not cover current HUD information or subtitles.
- The widest reactive state stays inside the canvas.
- Captions and alerts have planned positions.
- Decorative details stay away from the face and important game text.
- The layout has been watched in a recording, not only viewed as a still design.
If one item fails, change the scene before adding more decoration. A good PNGTuber overlay does not call attention to its safe zones. It simply leaves viewers able to follow the game and read the character at the same time.